
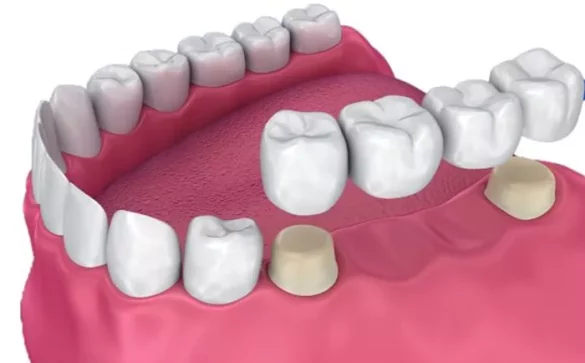
A dental bridge replaces a missing tooth. It fills a space. It restores your bite. It improves your smile. A bridge uses supporting teeth. These teeth hold an artificial tooth between them. The new tooth cannot be removed by the patient. The bridge is fixed permanently in the mouth.
A dental bridge traps plaque. It traps food debris. It allows bacteria to collect under the false tooth. This area is called a pontic. It rests above the gums. It does not allow floss to pass through like natural teeth. Because of this design, normal flossing does not work. The floss cannot slide between the teeth in the usual way. You must adapt your method.
Proper flossing prevents inflammation. It prevents odor. It reduces the risk of decay in the supporting teeth. It protects gum tissues under the pontic. It maintains long-term bridge stability. Cleaning under the bridge is essential for oral health.
Why Standard Flossing Does Not Work on a Dental Bridge
The space under the artificial tooth is closed. This structure creates a blocked contact area. The floss cannot enter from the top. Traditional up-and-down flossing techniques do not reach the trapped plaque. Food remains stick under the pontic because chewing pushes debris into this protected zone. If the area is not cleaned, bacteria thrive.
The gums under a bridge are prone to irritation. A lack of cleaning encourages gum swelling. It encourages bleeding. It encourages pocket formation. These pockets may deepen. They may lead to bone loss. They may create difficulty in chewing. They may cause sensitivity.
Because of these risks, special flossing tools exist. These tools help you clean under the pontic thoroughly.
Essential Tools Needed to Floss a Dental Bridge
Several cleaning tools exist for dental bridges. These tools help reach hidden plaque. They help remove food stuck beneath the false tooth.
1. Floss Threader
A floss threader works like a needle. It pulls floss under the bridge. It reaches deep spaces that normal floss cannot access. It is simple. It is inexpensive. It is widely available.
2. Super Floss
Super floss has three parts. It has a stiff end. It has a spongy middle section. It has a regular floss end. The stiff end enters under the bridge easily. The spongy section wipes plaque. The thin end polishes the sides of the teeth.
3. Interdental Brushes
A small brush cleans under the pontic. It scrubs biofilm. It removes sticky debris. It fits where floss may not glide smoothly.
4. Water Flosser
A water flosser sends a stream of water under the bridge. It removes loose debris. It reduces bacterial load. It cleans gently. It is ideal for sensitive gums. It is useful for patients with limited hand control.
5. Soft Picks
Soft picks can slide under the pontic. They bend easily. They massage the gums. They lift food particles nearby.
Step-by-Step Guide: How to Floss a Dental Bridge
Flossing a bridge takes patience. It also takes technique. Follow these steps carefully. Use slow motions. Use gentle pressure. Avoid rushing.
Step 1: Gather Your Tools
Choose your flossing method. Select a floss threader or super floss. Choose an interdental brush if needed. Choose a water flosser if you prefer water cleaning. Make sure your hands are clean. Prepare the floss before starting.
Step 2: Insert the Floss Under the Dental Bridge
Take about 18 inches of floss. Tie one end to a floss threader if you are using standard floss. With super floss, use the stiff end. Insert the threader gently under the bridge. Guide the floss toward the gum line under the pontic.
Move slowly to avoid trauma. Do not force the floss. If it resists, reposition and try again. Once the floss is under the bridge, hold it with both hands.
Step 3: Move the Floss Side to Side
Use a gentle sawing motion. Slide the floss under the pontic. Move it left and right. Let it contact the gum tissue lightly. Let it clean the base of the pontic. Allow it to remove plaque deposits.
Do not snap the floss. Do not pull aggressively. A slow, controlled movement is safer.
Step 4: Clean the Abutment Teeth
The supporting teeth are abutments. They hold the bridge. These teeth are at risk of decay. Wrap the floss in a C-shape around the first abutment. Move it gently up and down. Repeat on the other abutment. Clean all accessible surfaces.
Do not rush this process. Abutment teeth require careful cleaning because they carry the entire load of the bridge.
Step 5: Remove the Floss Carefully
Pull the floss through from the side. Do not pull upward. Pulling upward can damage the bridge. Remove slowly. Move to another section of clean floss. Continue flossing other areas.
Step 6: Repeat the Process Daily
Floss each day. Do not skip days. Plaque builds quickly. It hardens into tartar. Tartar irritates gums. It weakens the structure of the abutment teeth. It promotes gum inflammation.
How Often Should You Floss a Dental Bridge?
Daily flossing is recommended. Clean under the bridge at least once a day. Some patients need to floss twice daily. If you notice food trapped after eating, floss immediately. If your gums bleed, continue flossing gently. Bleeding improves once plaque is removed.
Your dentist may recommend professional cleanings every three to four months. Bridges need more attention. More professional cleaning reduces complications.
Common Mistakes When Flossing a Dental Bridge
Several errors affect cleaning efficiency. These mistakes increase the risk of gum disease.
Mistake 1: Flossing Too Hard
Using force damages gums. It causes bleeding. It irritates tissues. It may loosen the bridge ring around the abutments.
Mistake 2: Not Reaching Under the Pontic
Some people only clean the sides of the abutment teeth. They forget to go under the bridge. This area collects the most debris. Neglecting it leads to chronic inflammation.
Mistake 3: Using the Wrong Tools
Standard floss alone is not effective. Without a threader, the floss cannot access the space. Always use the correct tools.
Mistake 4: Skipping Daily Cleaning
Skipping days allows bacterial growth. It creates unpleasant odors. It leads to gum swelling. It accelerates decay around abutments.
Mistake 5: Failing to Replace Worn Brushes
Interdental brushes wear out quickly. A worn brush cannot remove plaque effectively. Replace them often.
Benefits of Proper Flossing Under a Dental Bridge
Cleaning your bridge daily improves oral health. It protects the gums. It maintains the strength of the supporting teeth. It helps the bridge last many years.
1. Reduces Gum Inflammation
Flossing removes bacteria from hidden spaces. It stops gum irritation. It reduces redness and swelling.
2. Prevents Decay on Abutment Teeth
Decay can form at the base of abutment teeth. Cleaning these areas reduces caries risk. It prevents future tooth loss.
3. Minimizes Bad Breath
Food stuck under the pontic decays. It produces odor. Flossing eliminates these particles. It freshens breath.
4. Protects Your Investment
A dental bridge is costly. Proper flossing extends its lifespan. Good maintenance delays replacement. Bridges can last ten to fifteen years or more with proper care.
5. Supports Overall Gum Health
Healthy gums support the teeth holding the bridge. Strong tissues reduce complications. They make chewing easier. They stabilize the bite.
Comparing Different Flossing Tools for Dental Bridges
Each tool offers unique benefits. Selecting the right tool improves the cleaning experience.
Floss Threader vs. Super Floss
A floss threader pulls standard floss under the bridge. It is versatile. It works with any type of floss. Super floss is faster. It enters easily because of its stiff end. The spongy middle cleans efficiently.
Interdental Brush vs. Water Flosser
An interdental brush scrubs plaque well. It removes sticky buildup. A water flosser reaches deep pockets. It flushes out debris. It is gentle and suitable for sensitive gums.
Soft Picks vs. Standard Floss
Soft picks are flexible. They bend easily under the bridge. They are comfortable for daily use. Standard floss needs assistance from a threader to enter difficult spaces.
How to Combine Multiple Cleaning Methods for a Dental Bridge
Combining tools enhances cleaning. A water flosser removes loose debris. Super floss removes sticky plaque. An interdental brush scrubs the pontic. Using more than one method improves results.
Suggested Daily Cleaning Routine
Use a water flosser first. Rinse out large particles. Add super floss. Slide it under the bridge. Clean abutment teeth carefully. Finish with brushing. Use fluoride toothpaste.
Suggested Weekly Deep Cleaning Routine
Use interdental brushes three times a week. Use an antiseptic mouth rinse. Schedule regular professional cleanings. Ask your dentist if you need periodontal maintenance visits.
Signs You Are Not Cleaning Your Dental Bridge Correctly
Your mouth gives clear signals. Watch for these signs. They suggest your cleaning method is incomplete.
Bleeding Gums
Inflamed gums bleed easily. Plaque irritates tissues. Continue cleaning gently. If bleeding persists, consult your dentist.
Bad Breath
Odor indicates trapped food. It suggests poor cleaning under the pontic.
Sensitivity Around the Bridge
Sensitivity may signal decay. It may suggest gum recession. It may indicate inflammation.
Food Getting Stuck Frequently
If food sticks often, increase flossing frequency. Use a water flosser after meals.
Visible Plaque or Tartar
Tartar feels rough. It appears yellow or brown. It requires professional removal.
When to Seek Professional Help
Some problems need professional attention. See your dentist if you notice changes. Seek help early. Early treatment prevents complications.
Persistent Swelling
Swelling suggests infection. It may indicate an abscess. It requires treatment.
Loose Abutment Teeth
A loose abutment weakens the bridge. You may feel the bridge shift. Contact your dentist immediately.
Pain Under the Bridge
Pain under the pontic suggests trapped debris. It may also signal gum disease. A professional cleaning resolves it.
Expert Tips for Maintaining a Clean Dental Bridge
You can extend your bridge’s lifespan with proper care. These expert tips improve cleaning results.
Tip 1: Use Fluoride Products
Fluoride strengthens abutment teeth. Use a fluoride toothpaste. Ask your dentist for fluoride varnish treatments if necessary.
Tip 2: Use Alcohol-Free Mouthwash
Alcohol dries the mouth. A dry mouth encourages bacterial growth. Use alcohol-free rinses instead.
Tip 3: Avoid Hard and Sticky Foods
Hard foods exert pressure. Sticky foods cling to the pontic. Avoid chewing ice. Avoid sticky candies.
Tip 4: Brush Twice Daily
Brush after breakfast. Brush before bed. Use a soft toothbrush. Use small circular motions.
Tip 5: Ask for a Bridge Cleaning Demonstration
Your dentist or hygienist can show you the exact technique. A demonstration improves accuracy. It reduces mistakes.
Long-Term Health Benefits of Proper Dental Bridge Care
Proper cleaning helps you preserve oral health. It extends the life of your bridge. It protects supporting teeth. It promotes gum stability.
With daily flossing, bacteria decrease. Inflammation decreases. Bone remains strong. Abutment teeth remain firm. Your investment in dental restoration remains protected.
Conclusion
A dental bridge needs special cleaning. Standard flossing does not reach the area under the pontic. Use a floss threader or super floss. Use interdental brushes or a water flosser. Clean your bridge every day. Protect your gums. Protect your abutment teeth. Maintain fresh breath. Extend the life of your restoration.