
Root planing is a fundamental periodontal procedure. It aims to remove contaminated cementum and dentin from tooth root surfaces. These surfaces often harbor bacterial toxins. They also retain calculus deposits. Root planing works together with scaling. Scaling removes deposits from the crown and root. Root planing smooths the root surface. This promotes periodontal healing.
This article is say about It explains how to perform root planing correctly. It provides step-by-step clinical guidance. It covers indications, preparation, instruments, technique, patient management, and follow-up care.
Understanding Root Planing in Periodontal Therapy
Definition of Root Planing
Root planing is a non-surgical periodontal procedure. It removes diseased cementum. It removes embedded calculus. It removes bacterial endotoxins. These substances interfere with soft tissue attachment. The process creates a clean and smooth root surface. This allows the gingiva to reattach.
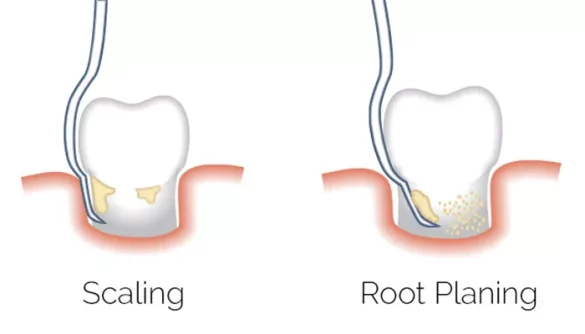
Difference Between Scaling and Root Planing
Scaling focuses on removing plaque and calculus. These deposits sit above and below the gingival margin. Root planing goes deeper. It targets the root surface itself. The intent is not only deposit removal. The intent is biological compatibility.
Scaling can be supragingival. It can be subgingival. Root planing is always subgingival. It is more meticulous. It requires advanced tactile skill.
Biological Rationale for Root Planing
Periodontal pathogens release endotoxins. These toxins bind to cementum. Inflamed tissues cannot heal on contaminated surfaces. Root planing removes this infected layer. A smooth surface reduces future plaque retention. Healing becomes possible.
Clinical Indications for Root Planing
Diagnosis of Periodontal Disease
Root planing is indicated in chronic periodontitis. It is also indicated in aggressive periodontitis. Probing depths usually exceed 4 millimeters. Bleeding on probing is present. Radiographic bone loss may be visible.
Signs That Root Planing Is Needed
Patients may present with swollen gums. Gums may bleed easily. Halitosis may persist. Tooth mobility can occur. Calculus may be detected below the gumline.
Contraindications and Precautions
Root planing may require caution. Patients with certain medical conditions need evaluation. These include bleeding disorders. These include uncontrolled diabetes. Cardiac conditions may require antibiotic prophylaxis. Consultation with a physician is sometimes necessary.
Preoperative Assessment and Planning
Comprehensive Periodontal Examination
A full periodontal chart is required. Pocket depths are measured. Clinical attachment levels are recorded. Furcation involvement is assessed. Gingival recession is noted.
Radiographic Evaluation
Periapical and bitewing radiographs are useful. They reveal bone levels. They show calculus deposits. They help identify root morphology. Accurate interpretation guides instrumentation.
Patient Communication and Consent
The procedure must be explained clearly. Patients should understand the purpose. They should know the benefits. Potential discomfort must be discussed. Written informed consent is recommended.
Armamentarium for Root Planing
Hand Instruments
Curettes are essential. Gracey curettes are area-specific. Universal curettes can be used in all areas. Sharp instruments are mandatory. Dull instruments reduce efficiency.
Ultrasonic and Sonic Instruments
Ultrasonic scalers assist root planing. They disrupt biofilm. They remove heavy deposits. They improve access to deep pockets. Hand instruments still refine the surface.
Adjunctive Tools
Periodontal probes guide treatment. Mouth mirrors aid visualization. Local anesthetic syringes provide comfort. Irrigation syringes may deliver antimicrobial solutions.
Patient Preparation and Anesthesia
Positioning the Patient
Proper positioning improves access. The patient should be reclined. The clinician should maintain ergonomic posture. Adequate lighting is essential.
Local Anesthesia Considerations
Root planing can cause discomfort. Local anesthesia is often indicated. Infiltration or nerve blocks may be used. Profound anesthesia improves patient cooperation.
Infection Control Measures
Standard precautions must be followed. Gloves and masks are mandatory. Instruments must be sterile. Cross-contamination must be prevented.
Step-by-Step Technique for Root Planing
Step One: Initial Debridement
Begin with gross scaling. Remove large calculus deposits. Ultrasonic devices are effective here. This step improves visibility. It improves access.
Step Two: Instrument Selection and Adaptation
Select the correct curette. Match the instrument to the tooth surface. The lower shank should be parallel to the tooth. Correct adaptation prevents trauma.
Step Three: Establishing Correct Angulation
The working angulation is critical. It should be between 60 and 80 degrees. Too shallow reduces effectiveness. Too steep damages tissue.
Step Four: Controlled Root Planing Strokes
Use short, firm strokes. Strokes should be overlapping. Apply lateral pressure. Maintain finger rest for control. Work systematically.
Step Five: Root Surface Evaluation
After instrumentation, evaluate the surface. Use an explorer. The surface should feel smooth. No ledges should remain.
Step Six: Irrigation and Final Inspection
Irrigate the pocket thoroughly. Remove debris. Antimicrobial solutions may be used. Inspect the area visually and tactually.
Instrumentation Techniques by Tooth Area
Anterior Teeth Root Planing
Anterior teeth have narrow roots. Gracey 1-2 and 3-4 curettes are ideal. Light pressure is required. Access is usually easier.
Posterior Teeth Root Planing
Posterior teeth present challenges. Furcations are common. Gracey 11-12 and 13-14 curettes are used. Careful angulation is necessary.
Furcation Management
Furcations require special attention. Mini-bladed curettes may be used. Ultrasonic tips designed for furcations are helpful. Complete calculus removal is difficult but essential.
Clinical Endpoints and Success Indicators
Tactile Smoothness
A smooth root surface is a primary endpoint. The explorer should glide without resistance. Roughness indicates residual calculus.
Reduction in Inflammation
Successful root planing reduces bleeding. Gingival color improves. Swelling decreases. These changes occur over weeks.
Improved Periodontal Measurements
Pocket depths may reduce. Attachment levels may stabilize. These outcomes confirm effective therapy.
Postoperative Care and Patient Instructions
Immediate Post-Treatment Advice
Patients may experience sensitivity. Mild discomfort is common. Analgesics can be recommended. Avoid hard foods initially.
Oral Hygiene Reinforcement
Proper brushing technique is essential. Interdental cleaning must be emphasized. Patients should maintain plaque control.
Use of Adjunctive Products
Desensitizing toothpaste may help. Antimicrobial mouth rinses can be prescribed. Chlorhexidine is commonly used.
Potential Complications and Management
Root Sensitivity
Sensitivity is common after root planing. Exposed dentin reacts to stimuli. Fluoride applications can help. Sensitivity usually decreases over time.
Gingival Recession
Inflamed tissue may shrink. This reveals more root surface. Patients should be informed. Recession is often a sign of healing.
Incomplete Calculus Removal
Deep pockets may retain deposits. Reevaluation is important. Additional sessions may be required. Surgical therapy may be considered.
Reevaluation and Maintenance Phase
Timing of Reevaluation
Reevaluation typically occurs after four to six weeks. Healing is assessed. Periodontal measurements are repeated.
Determining the Need for Further Treatment
If pockets persist, further therapy is planned. This may include additional root planing. Surgical options may be discussed.
Long-Term Periodontal Maintenance
Maintenance is critical. Regular professional cleanings are required. Three- to four-month intervals are common. Disease recurrence must be prevented.
Evidence-Based Perspective on Root Planing
Scientific Support for Root Planing
Clinical studies support root planing. It reduces bacterial load. It improves periodontal health. It remains a cornerstone of therapy.
Limitations of the Procedure
Root planing is not a cure. It controls disease. Patient compliance is essential. Advanced cases may need surgery.
Professional Skill and Continuous Improvement
Importance of Clinician Experience
Effective root planing requires skill. Tactile sensitivity develops over time. Continuous practice improves outcomes.
Continuing Education and Training
Clinicians should pursue ongoing education. New instruments and techniques emerge. Evidence-based practice improves patient care.
Conclusion
Root planing is a precise and essential periodontal procedure. It removes diseased root surface material. It allows tissue healing. Proper assessment, correct instrumentation, and systematic technique are required. When performed correctly, root planing improves periodontal health. It preserves natural dentition. It remains a cornerstone of modern dental care.