
Mouth guards are essential for protecting your teeth during sports, night grinding, or orthodontic treatment. Proper cleaning is crucial to prevent bacterial growth, bad odors, and damage to the guard. While commercial cleaners are available, natural methods are safe, cost-effective, and eco-friendly. This guide will provide a detailed, step-by-step approach to cleaning your mouth guard naturally, ensuring both hygiene and longevity.
Why Natural Cleaning Methods Are Important
Using natural cleaning methods helps protect your mouth guard from harsh chemicals that can degrade its material. Many commercial solutions contain alcohol, chlorine, or strong acids that weaken the plastic over time. Natural cleaning keeps your mouth guard safe for daily use, preserves its shape, and reduces exposure to harmful substances that can irritate your gums or teeth.
Materials Needed for Natural Cleaning
Before starting, gather these natural materials:
Baking soda: Neutralizes odors and gently cleans without scratching.
White vinegar: Kills bacteria and removes stains.
Hydrogen peroxide: Disinfects and whitens safely.
Mild liquid soap: Natural or unscented soaps avoid chemical residues.
Warm water: Helps dissolve residues and activate cleaning agents.
Soft toothbrush or mouth guard brush: Ensures thorough cleaning without damage.
Small container or cup: For soaking your mouth guard.
How to Clean Mouth Guard Naturally: A Step-by-Step Guide
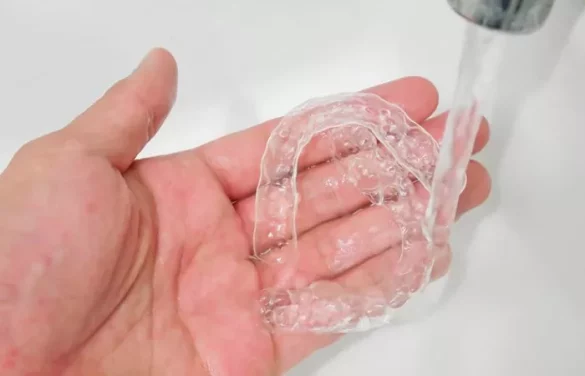
Step 1: Rinse Your Mouth Guard After Each Use
Immediately after using your mouth guard, rinse it under lukewarm running water. This removes saliva, food particles, and bacteria. Avoid using hot water, which can warp the plastic. Rinsing regularly prevents plaque buildup and makes deeper cleaning more effective.
Step 2: Prepare a Baking Soda Paste
Baking soda is a natural abrasive and deodorizer. To prepare a paste:
Mix 1 tablespoon of baking soda with 1–2 teaspoons of water.
Stir until it forms a smooth paste.
Apply the paste to your mouth guard with a soft toothbrush. Gently scrub all surfaces, including edges and grooves. Baking soda removes residue and neutralizes odors without damaging the guard.
Step 3: Soak in White Vinegar Solution
White vinegar is a natural antibacterial agent that removes stains. For soaking:
Mix equal parts of white vinegar and warm water in a small container.
Place the mouth guard in the solution for 30 minutes.
Rinse thoroughly with cool water afterward to remove vinegar taste.
Regular vinegar soaks prevent bacterial growth and maintain a fresh taste.
Step 4: Disinfect with Hydrogen Peroxide
Hydrogen peroxide is an effective natural disinfectant. To disinfect your mouth guard:
Use a 3% hydrogen peroxide solution.
Soak the mouth guard for 10–15 minutes.
Rinse thoroughly with lukewarm water.
This step kills germs and reduces the risk of infections. Hydrogen peroxide also helps prevent yellowing of the plastic over time.
Step 5: Use Mild Soap for Gentle Cleaning
Mild, unscented soap is safe for daily cleaning. Follow these steps:
Apply a small amount of soap to a soft toothbrush.
Gently brush the entire mouth guard, paying attention to grooves and edges.
Rinse thoroughly to remove all soap residues.
This step ensures that all dirt and residual bacteria are removed, keeping the mouth guard safe for use.
Step 6: Air Dry Completely
After cleaning, allow the mouth guard to air dry completely. Place it on a clean surface or a breathable container. Avoid covering it with a lid while wet, as this promotes bacterial growth. Proper drying helps maintain its shape and hygiene.
Step 7: Store Properly
Proper storage prevents deformation and bacterial contamination:
- Use a ventilated container designed for mouth guards.
- Keep it away from direct sunlight and heat sources.
- Ensure the container is clean and dry.
Storing your mouth guard correctly prolongs its lifespan and keeps it safe for regular use.
Tips for Maintaining Mouth Guard Hygiene
To keep your mouth guard in top condition:
- Clean daily: Even light use requires daily rinsing and weekly deep cleaning.
- Avoid boiling water: High heat can warp the plastic and reduce fit.
- Check for damage: Regularly inspect for cracks or tears, which can harbor bacteria.
- Replace when necessary: Mouth guards should be replaced every 6–12 months or sooner if damaged.
Common Mistakes to Avoid
Many people unintentionally damage their mouth guard during cleaning. Avoid these mistakes:
Using harsh chemicals: Bleach or alcohol-based cleaners can weaken the guard.
Scrubbing too hard: Aggressive brushing can create micro-scratches that trap bacteria.
Skipping rinses: Residue from cleaning agents can irritate the mouth.
Storing wet: Moisture encourages mold and bacteria growth.
Additional Natural Cleaning Options
Other natural alternatives include:
Saltwater solution: Dissolve 1 teaspoon of salt in a cup of warm water. Soak the mouth guard for 10–15 minutes to reduce bacteria.
Lemon juice: Mix with water for a mild antibacterial rinse. Use sparingly to avoid weakening the plastic.
Coconut oil pulling: Swish coconut oil over the mouth guard to remove bacteria naturally.
How Often Should You Clean Your Mouth Guard?
Daily cleaning with water or mild soap is recommended. Weekly deep cleaning using baking soda, vinegar, or hydrogen peroxide helps maintain hygiene and prolong the guard’s lifespan. Adjust frequency based on usage intensity and exposure to bacteria.
Benefits of Natural Cleaning
Using natural cleaning methods offers multiple advantages:
Safety: Avoids exposure to harsh chemicals that may harm teeth or gums.
Cost-effective: Common household items are inexpensive and widely available.
Environmentally friendly: Reduces chemical waste.
Effective: Natural agents like baking soda and vinegar efficiently remove bacteria and odors.
Signs Your Mouth Guard Needs Replacement
Even with proper cleaning, mouth guards have a limited lifespan. Replace yours if you notice:
- Cracks or tears in the plastic
- Persistent bad odor despite cleaning
- Warping or loss of proper fit
- Discoloration or surface roughness
Replacing a damaged guard ensures optimal protection and hygiene.
Conclusion
Cleaning your mouth guard naturally is simple, safe, and effective. By following these step-by-step methods using baking soda, vinegar, hydrogen peroxide, and mild soap, you can maintain excellent hygiene, prevent bacterial buildup, and prolong the life of your mouth guard. Daily care, proper storage, and regular inspection are key to keeping your mouth guard clean and effective. Incorporating these natural methods into your routine ensures a healthier mouth and a longer-lasting guard.